Table of Contents
Audio file compatibility is a big challenge, especially when dealing with different formats across various devices and platforms. One common scenario involves the M4A format, a popular choice for its high-quality audio associated with Apple devices. However, not all devices or software support M4A. Hence it is necessary to convert these files to a more universally accepted format like MP3.
Fortunately, you don’t need to invest in expensive software to make this conversion. In this guide, we’ll explore three free and effective methods to convert M4A audio files to MP3 on both Mac and PC.
Method 1: Convert M4A to MP3 with AudioKies
AudioKies is a powerful toolkit for converting, merging, compressing, trimming and extracting audio files. This cross-platform app is current the best option for converting M4A file to MP3. The steps are quite simple and you can convert dozens of music files at one with the bulk conversion engine.


Step 1: Download and Install AudioKies
Download a copy of setup file and install the AudioKies app on your Mac or Windows PC.

Step 2: Add M4A File and Select MP3 as Output Format
Open AudioKies app on your computer and click the Add File or Add Folder menu at the top to import M4A files into the program. Now, move to bottom and choose MP3 as the Output format. Also select a local folder to save the converted files.
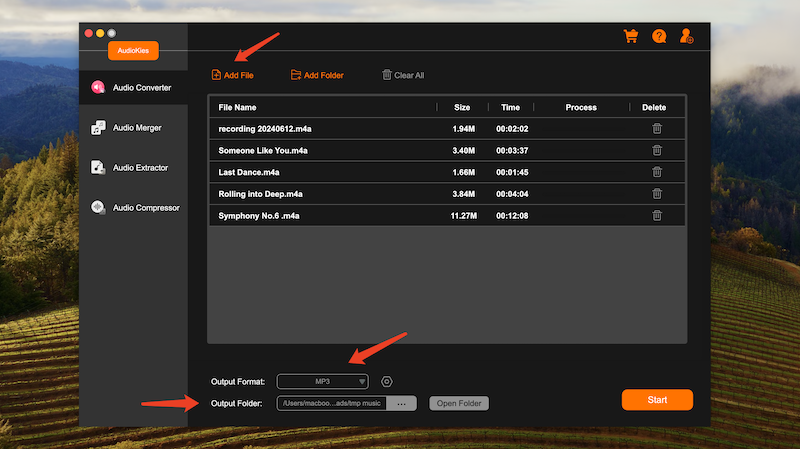
Step 3: Start Converting M4A to MP3
After all the M4A files are added to the program, please click the Start button to begin the conversion process. When the progress bar goes to the 100%, this means the conversion is finished. You can now open the output folder and play the music file.

This is one of the best ways to convert M4A to MP3. No ads and no hassle! Please try out on your computer from now!
Method 2: Convert M4A to MP3 with FFMPEG

FFMPEG is a powerful, open-source multimedia framework capable of handling a wide array of audio, video, and other multimedia files and streams. Known for its versatility and extensive functionality, FFMPEG is widely used by professionals and enthusiasts alike for tasks ranging from simple format conversions to complex video editing. One of its most popular uses is converting audio files between different formats, such as converting M4A files to MP3.
Step 1: Download and Install FFMPEG
For Windows: Download the FFMPEG executable from the official FFMPEG website. Extract the files and add the bin folder to your system’s PATH environment variable.
For Mac: Open the Terminal and run the following command:
brew install ffmpeg
Step 2: Navigate to the Directory Containing Your M4A File
Use the cd command to change the directory. For example:
cd path/to/your/audio/files
Step 3: Convert M4A to MP3 Using FFMPEG
Run the following command in the terminal or command prompt, replacing input.m4a with the name of your M4A file and output.mp3 with the desired name for your MP3 file:
ffmpeg -i input.m4a -c:v copy -c:a libmp3lame -q:a 4 output.mp3
Once the conversion is complete, you should see your new MP3 file in the specified directory. Play the file to ensure the conversion was successful and the audio quality meets your expectations.
Method 3: Convert M4A to MP3 with Audacity
Audacity is a free audio editing software that is highly popular for its robust set of features and user-friendly interface. It is available for Windows, macOS, and Linux. Currently, it is a very famous tool for audio recording, editing, and conversion. One of the common tasks users perform with Audacity is converting audio files from one format to another. If you have M4A audio files that you need to convert to MP3, Audacity provides a straightforward solution without requiring extensive technical knowledge.
Step 1: Download and Install Audacity
Visit the official Audacity website and download the version suitable for your operating system. Follow the installation instructions to set up Audacity on your computer.
Step 2: Install the FFmpeg Library for Audacity
Audacity requires the FFmpeg library to import and export a wide range of audio formats, including M4A. Follow the instructions on the Audacity FFmpeg installation page to install the library for your operating system.
Step 3: Import the M4A File
Click on ‘File’ in the menu bar, select ‘Import’, and then choose ‘Audio’. Navigate to the location of your M4A file, select it, and click Open.
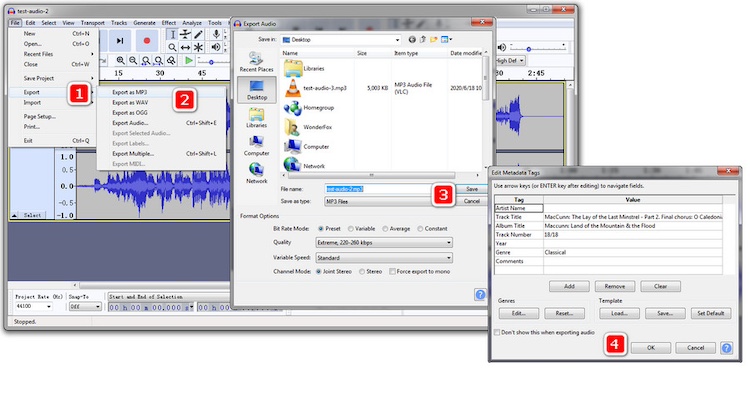
Step 4: Export the File as MP3
Once the M4A file is loaded into Audacity, click on File again, and select Export. From the export options, choose Export as MP3. A dialog box will appear allowing you to choose the location to save the MP3 file and to set various options like bitrate. Choose your desired settings and click Save.
Conclusion
Converting M4A audio files to MP3 doesn’t have to be a complicated or costly process. By utilizing the free methods outlined in this guide, you can easily ensure your audio files are compatible with a wider range of devices and software. Whether you’re using a Mac or a PC, these tools provide straightforward solutions to meet your conversion needs. With just a few simple steps, you can enjoy your audio content without any format-related restrictions, making your digital life more convenient and versatile.