Table of Contents
The lightning speed of your Mac is largely attributed to the SSD, which is the fastest storage device on earth. However, the standard versions of MacBook Air, MacBook Pro, and Mac Mini come with a 256GB SSD due to the high cost of flash storage. Hence, it is very important to manage storage efficiently on your Mac. It brings a lot of inconvenience if the free storage is low on your Mac, especially important on modern macOS such as Sonoma.
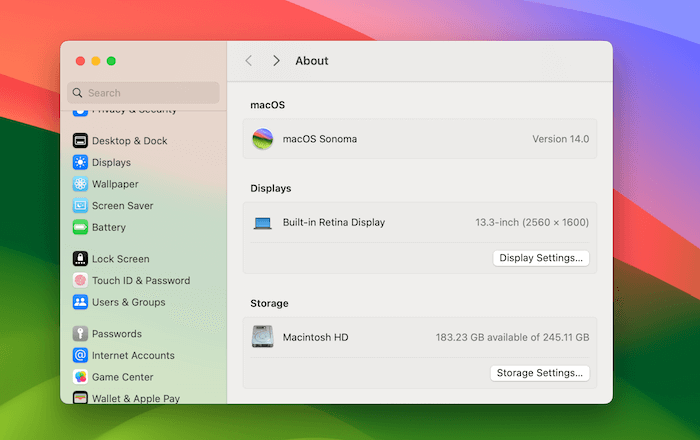
When working with constrained storage on Mac Sonoma, it’s essential to stay ahead. Here are some a few noteworthy actions (which you can eventually set to run automatically) to recycle precious storage on your Mac. This ensures you won’t encounter the daunting "Your disk is almost full" alert when saving a large file next time. In this tutorial, we will show you how to free up space on Mac Sonoma.
1. Empty the Trash Can
Were you aware that macOS Sonoma leaves items in the Trash indefinitely? You might be harboring several gigabytes of unused data there. Emptying the trash is the best and easiest trick to free up space on a Mac.
To clear the trash, right-click on the Trash icon on your Dock and choose Empty Trash. This will delete all the files and folders from Trash. Remember, data is unrecoverable once removed in this way. Please first go to the Trash app and restore back the important ones before emptying the trash folder.
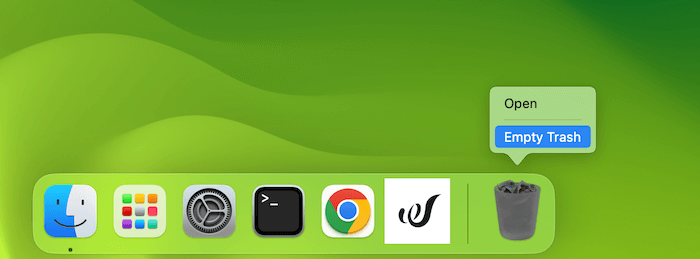
For scheduled trash clearance, navigate to Finder > Preferences > Advanced and select the option to ‘Remove items from the Trash after 30 days.’
2. Remove Old iOS Backup Files
Mac users usually come with one or more iOS device. When an iPhone, iPod or iPad is connected to Mac Sonoma, it will be asked for sync and device backup. This is automated action in Apple’s ecosystem. Unfortunately, these iOS backups can occupy a significant amount of storage. You should delete the duplicate OR unused backup to free up space on your Mac.
Navigate to the iOS Files category within the Storage window. Mac Sonoma will list all the iOS backup files on this device. Please choose the right one and delete it from your Mac.
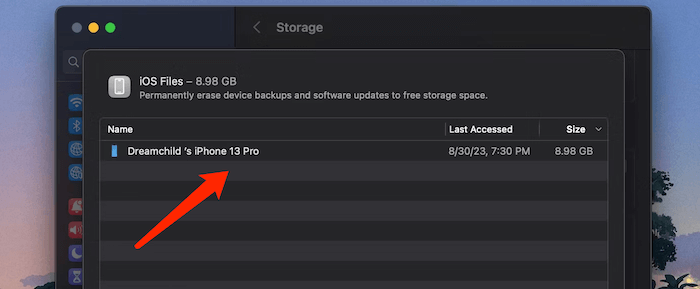
Similarly, on older Mac models, you have the option to clear data from the iTunes section. This will list content like movies, TV series, and audiobooks. On the more recent macOS versions, distinct sections for Apple’s native apps such as Music and Podcasts are displayed.
3. Identify and Delete Large Files
Disk images and movies are large files which eat up the internal storage on Mac extensively. By deleting the large files (move to external drive for backup if they are still important), you can free up a significant disk space on your Mac. On Mac Sonoma, go to the Storage window and select the Documents category. By default, it will showcase the Large Files section.
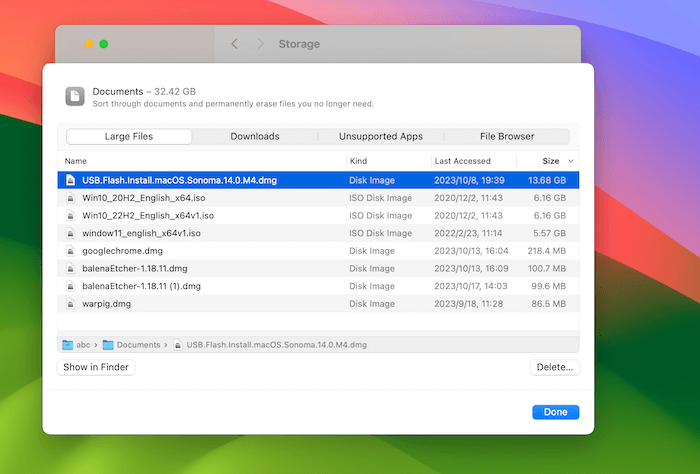
A quick way to get more considerable storage is by deleting a few large files and moving them to external hard drive as backup. Sorting out many tiny files is a more time-consuming affair. Examine the top-listed files and determine if they’re expendable. To erase a file, highlight it and hit the Delete button.
After addressing the larger files, it’s beneficial to delve deeper. For instance, a folder occupying 1.5GB with outdated photos consumes as much space as a single 1.5GB video, yet it’s more elusive.
macOS Sonoma simplifies this task. Above the Documents interface are two additional file-sorting features: Downloads and File Browser.
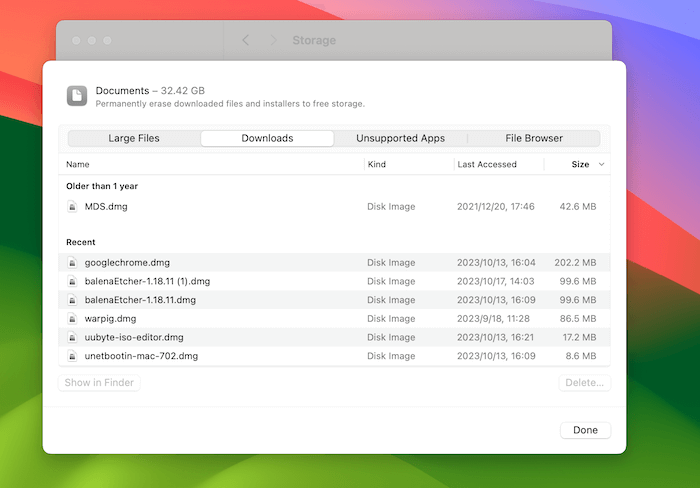
The Downloads segment itemizes files and directories older than three months, half a year, or a full year. This allows you to sift through long-untouched files and evaluate their relevance.
File Browser essentially offers a Finder perspective within the storage management utility. Here, you can traverse your entire Mac, pinpointing and erasing unnecessary files or folders.
4. Delete Apps You Don’t Need Any More
For tech enthusiasts who loves to try out new apps, the allure of experimenting with new Mac apps is undeniable. However, it’s common to forget removing them after a trial run. Some of apps could take a large amount of storage so deleting those apps could free up more space on your Mac.
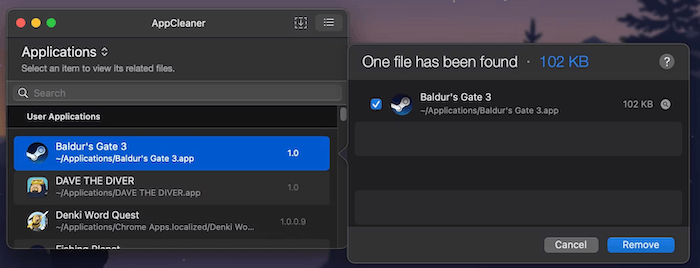
First, get a sense of what’s installed on your system. Ironically, to assist with this, download a complimentary app named AppCleaner. It may seem counterintuitive to download another app, but AppCleaner is a game-changer. It excels at uninstalling Mac apps, ensuring all associated residual files are eradicated.
Launch AppCleaner, tap on the list icon at the upper right, select any app you no longer require, and hit the Remove button. Contemporary macOS editions include an integrated storage management tool (a feature we’ll revisit throughout this guide).
To access it, click on the Apple symbol in the menu bar, choose System Preferences, then navigate to General > Storage. This section provides an overview of your Mac’s storage usage and identifies what’s consuming the space.
Within this section, there are suggested measures to efficiently manage your Mac’s storage, such as moving files to iCloud, setting the Trash to empty by itself, and auto-deleting watched Apple TV content.
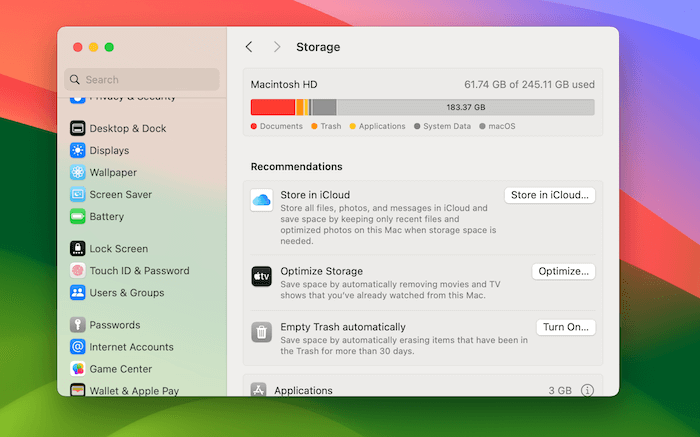
As you navigate further down, you’ll spot a categorized list (like Applications, Documents, Mail, Messages, and more). When you select Applications, a list will display the installed apps in order of their storage footprint. Choose any app or multiple apps you wish to remove, and simply press the Delete button.
5. Save Desktop and Documents to iCloud
The "Store in iCloud" capability automatically archives data from your Desktop and Documents folders to iCloud, retaining only the freshest files on your local device. Older files can be easily retrieved with a simple click when required.
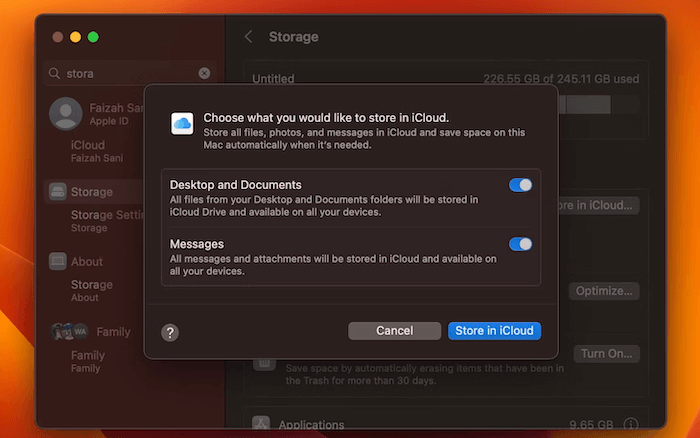
While this feature is innovative, it doesn’t boast impeccable reliability. If crucial work-related documents reside in your Documents folder, we advise against relying on this feature. However, for a majority of users, activating this function can liberate significant storage space.
To set this in motion, navigate to the Storage area in System Preferences and select the "Store in iCloud" option located under the Recommendations tab.
6. Clean Up the Folders of Cloud Storage App
For those using cloud storage services like Dropbox or Google Drive to sync files, it’s crucial to discern which data is solely on the cloud versus what’s downloaded on your Mac. Typically, these cloud storage platforms are set to download all content to your device.
For Google Drive users, it’s wise to inspect the Offline Files section under Settings. There’s a possibility it has pulled a sizable portion of files that you already possess in your Google Drive cloud.
For those on Dropbox, leveraging the Selective Sync feature can be beneficial. Navigate to Settings > Sync, then tap on the Choose Folders to Sync button. Scrutinize this directory and deselect any folders not of immediate importance. It’s worth noting that your Dropbox content remains readily available via its website or mobile application.
7. Automatic Free up Mac Disk with CleanGeeker (Recommended)
While the manual cleanup approach is certainly potent (we managed to free up 30GB using the previously mentioned strategies), revisiting this process frequently can be tedious. Especially for those who use their Mac intensively, a monthly cleanup might be necessary.
Fortunately, there are dedicated apps designed to streamline and automate the maintenance of your Mac. TunesBro CleanGeeker is a comprehensive tool crafted to ensure your Mac operates at peak performance. This tool aids in removing cache files, temporary clutter, and unwanted apps. Its smart file browser assists in identifying and disposing of stale or unnecessary files. You can run CleanGeeker smoothly on the latest macOS Sonoma operating system.
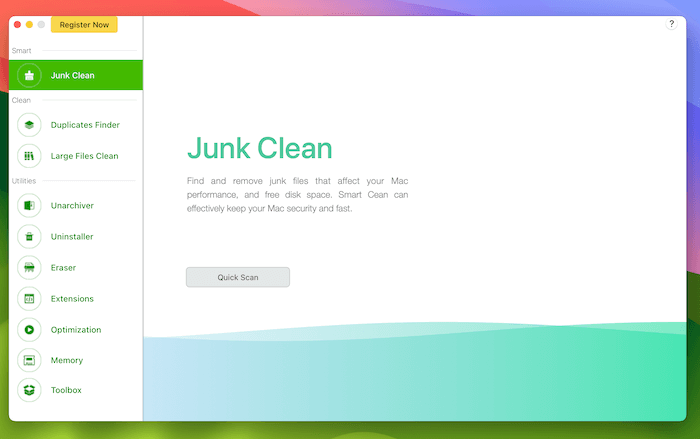
In addition, CleanGeeker comes equipped with a module explicitly designed to pinpoint duplicate files. There’s a likely chance you possess multiple copies or very similar versions of photos, documents, or videos. CleanGeeker expertly identifies these redundancies, facilitating their removal from your Mac.
FAQs about Freeing Up Space on Mac
Why is my Mac’s storage filling up so quickly?
Mac storage can fill up due to various reasons: accumulation of temporary files, caches, old backups, duplicate files, and large applications or software updates.
Does emptying the Trash on my Mac free up space?
Yes, emptying the Trash removes files permanently and releases the occupied storage.
Is it safe to delete cache files on Mac?
Yes, it’s generally safe. Cache files are temporary and meant to speed up tasks. However, once deleted, some apps might take a bit longer to open the first time, but they will recreate the necessary cache files over time.
How often should I clean up my Mac?
For optimal performance, it’s good practice to perform a cleanup every few months. However, if you frequently download, edit, or remove files and applications, you might need to do it more often.
Do cloud storage apps like Dropbox and Google Drive take up space on my Mac?
By default, these apps sync and download files to your Mac. However, settings can be adjusted to limit local storage use.
Is it safe to use third-party apps like TunesBro CleanGeeker?
Yes, as long as they are downloaded from reputable sources or directly from the official website. Always ensure to review user feedback and ratings.
How do I check what’s taking up space on my Mac?
Navigate to Apple Logo > About This Mac > Storage. Here you’ll see a breakdown of storage usage.
Can I delete old iOS backups from my Mac?
Yes, old backups can consume a lot of space. It’s advisable to keep only the most recent backup and delete older ones unless there’s a specific need.
What’s the difference between clearing storage and clearing memory on a Mac?
Storage refers to disk space (where files, apps, and data are stored). Memory, on the other hand, refers to RAM (Random Access Memory) which temporarily holds data for processing. Clearing storage frees up disk space, while clearing memory can make your Mac operate faster.
Summing Up
With the reclaimed storage at your disposal, it’s time to get back to being productive on your Mac. Periodically revisiting these steps ensures that running out of disk space becomes a concern of the past. These are the useful tricks you should follow to free up space on Mac Sonoma.
Additionally, there are small tweaks you can incorporate to enhance your daily Mac experience. For example, repositioning the Dock to the right side, utilizing Stacks for a tidier desktop, and adopting Spaces can further streamline your desktop environment.
