Apple's big OS release - macOS 11 Big Sur - is possible coming in September or October 2020. However, a lot of Mac users are already testing out the beta versions of the software after signing in to Apple's Beta Software Program. If you're currently a beta software tester or have access to macOS Big Sur DMG file for one of the beta versions, then it is easy to make a USB installer from dmg file on Windows or Mac. This article shows you different ways to do it and suggest the tools you'll need to make a bootable macOS Big Sur USB installer.
DMG Editor - Make Bootable Big Sur USB Installer (Windows & Mac)
DMG Editor is the latest product developed by UUByte for creating bootable macOS USB installer from dmg file. Desipte this core function, it also allows you to extract the contents of DMG files, which is a terrific feature for advanced users. Most importantly, DMG Editor can run on both Windows PC and Mac without any issue.
Besides, the interface and controls are simple enough for a beginner to successfully do the job as well, which makes it appealing to a much larger audience. With this tool, you can actually create multiple bootable drives in a single action. Let's look at to make bootable macOS Big Sur USB installer with this software. Before going ahead, please download macOS Big Sur dmg file first.


Step 1: Download UUByte ISO Editor from the official UUByte website and install the application on a working PC or Mac. Please make sure download the appropriate version.
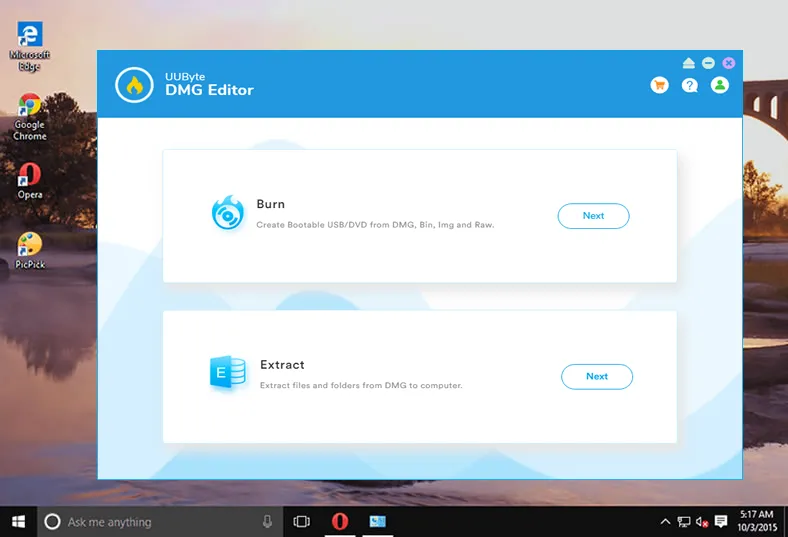
Step 2: Insert the USB pen drive (Minimal 16GB capacity) and backed it up if you have important data on it. Now, launch UUByte DMG Editor from your computer and Click 'Burn' button.

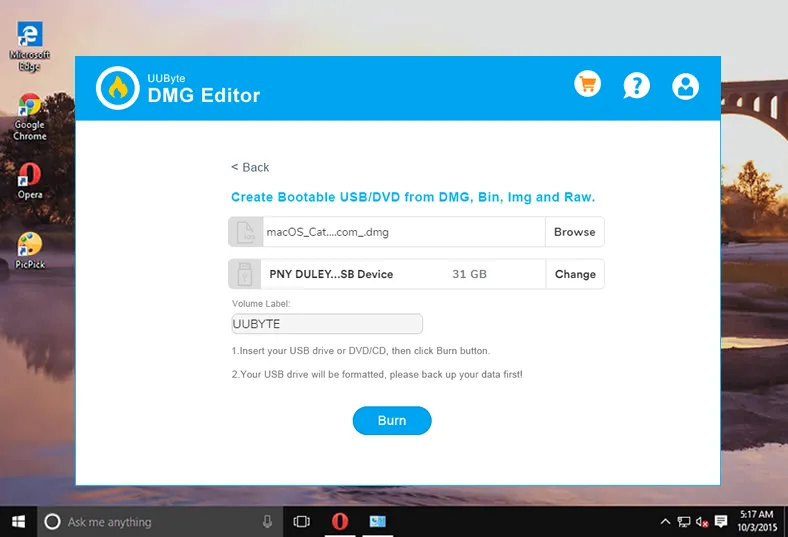
Step 3: On the UUByte interface, select the DMG file of macOS Big Sur from your local driver, choose the USB drive on which the installer file needs to be burned, and hit the Burn button. That's it!

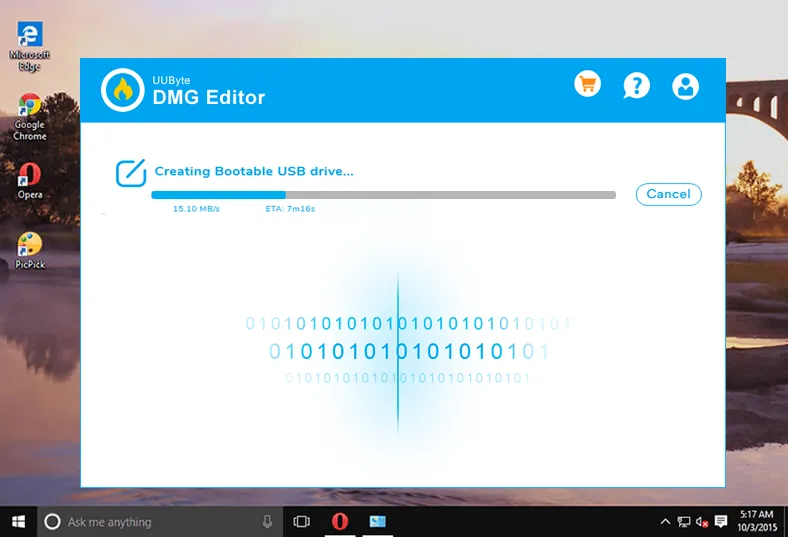
Step 4: Before you hit 'Burn' button, you can also change the Volume Label or name of your USB installer. Once it gets started, this program will burn macOS dmg file to USB and you can see a progress bar for the on-going task.

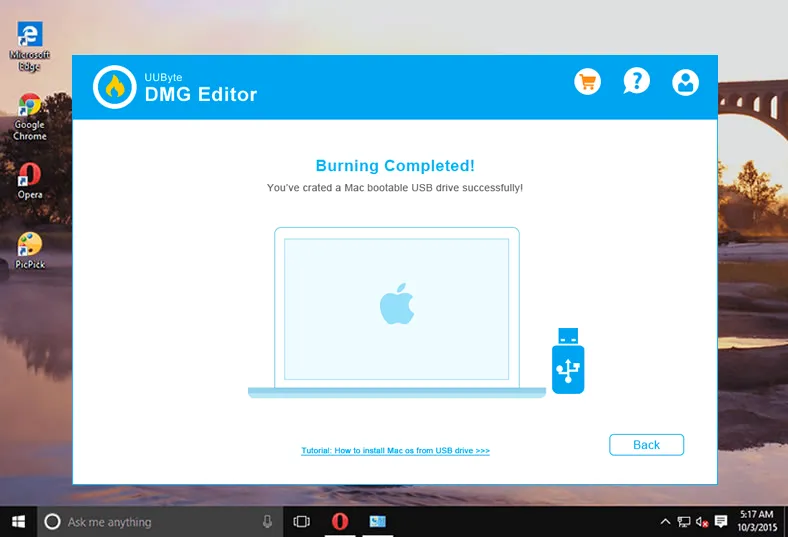
Step 5: The job should be done in about 10 minutes, and it will be a working USB installer for Big Sur that you can use to install macOS Big Sur on a Mac or supported Hackintosh.

You won't find any other software or apps that can do this task in sucn an easy way. A macOS bootable USB installer will be ready after several mouse clicks. No advanced settings and no hassle at all. All the technical details are sitting down at the background layer.
.

Make macOS Bootable USB Installer on Mac via Terminal
This method shows you how to create the USB installer for Big Sur on a Mac computer using two utilities: Disk Utility and Terminal. Follow the process as shown below after you have your USB drive ready. It should have a minimum capacity of 16GB but make sure you have backed up any data on it because it will be deleted as part of the process. You should also have the .app installer file ready, which you can get from the Downloads section of Apple's developer site using a developer account.
Step 1: Plug the USB stick into an available port on your Mac and launch the Disk Utility application from the Applications → Utilities folder.
Step 2: Click the Erase tab. In the pop-up window, leave the name as 'Untitled', then select APFS as your preferred format and click the Erase button. Click Done once the erasure is complete.

Step 3: Launch the Terminal app from the same location as the Disk Utilities app. Use the following command to write the Big Sur install app file to the USB drive:
sudo /Applications/Install\ macOS\ Beta.app/Contents/Resources/createinstallmedia --volume /Volumes/Untitled
Step 4: Enter the admin password when prompted, followed by Enter.
Step 5: Confirm data erasure with a Y and Enter. Since you've already deleted and formatted the drive, this should happen quickly.
Step 6: When the job is complete, you'll see it in Terminal. Shut down Terminal, eject your drive, and you can now use it as a bootable USB installer for macOS Big Sur.
This is an easy method for making bootable Big Sur USB installer on a Mac but it may require some experience since it involves erasing the disk, formatting it, and using Terminal, which a lot of Mac users may not be comfortable with. At the end of this article, we show you a tool to do it directly, without the need to have any kind of technical experience.
Make macOS Bootable USB Installer on PC via TransMac ($59)
TransMac is a popular premium tool to create macOS USB installers in Windows from DMG disk image as well as other Apple installer files. It's basically a disk management tool but we can use a workaround to make a bootable installer for Big Sur, as long as you have the full DMG file for it. Assuming you have it in hand on your Windows PC, here's the rest of the process:
Step 1: Download and install TransMac for Windows on your PC and launch the application with admin rights.
Step 2: Insert the USB drive and locate it in the left panel. Right-click the drive and choose 'Restore with Disk Image.'

Step 3: If you see a warning, dismiss it. Use the Browse button to navigate to and select your Big Sur DMG file. Confirm with OK to import it into TransMac for creating the bootable USB installer.
Step 4: When you see the next warning notification, simply click Yes. This is to confirm that the file can be decompressed by the TransMac app.
Step 5: Your USB installer will be created in a little while. It might take time on older Windows computers but it should work.
This method makes it easy to create bootable USB installer for Big Sur. But it only runs on Windows PC and it is much expensive. Most people are looking for TransMac alternatives when they don't have enough budget.
Conclusion
Generally speaking, UUByte DMG Editor is more welcomed when it comes to make macOS Big Sur USB installer because of user-inerface and efficient. TransMac is great, too. But it has no Mac version yet. When you are on Mac and comfortable with text command, then Terminal app is also a nice option out there.


